Tuesday, January 13, 2015

2014-2015 - Pretraining, Block1 (Rehab from hip surgery)

In the previous blog for this series, I outlined my 2014-2015 Winter training goals and the training plan intended to take me there. This blog reviews the first 2 blocks of that training plan.

Transition


Because I had hip surgery on Sept 7, 2014, my 2014-2015 Winter training season started much earlier than usual with a 5-week training block spanning Sep 15 to Oct 19. Surprisingly, though using a cane throughout this Transition block, I was able to tolerate trainer workouts quite comfortably.

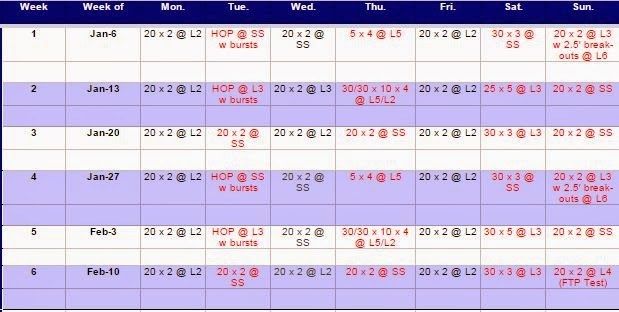
Figure 1: workout comprising my Transition training block.

Figure 1, above, shows the workouts done during Transition. I began my training cautiously (still on crutches), restricting my early workouts to Level 2 (L2), but, easily able to tolerate more intensity, I bumped up to Sweet Spot (SS) quite rapidly. Perhaps too rapidly, however, as discolouration in the area of my injury (it turned black and blue), most likely swelling due to inflammation, tempered my early enthusiasm and kept me off the bike for most of Week 3. I resumed training again in Weeks 4 and 5, this time taking a more gradual approach to increasing the intensity.

The workouts done during this block were comprised almost entirely of the standard 20' x 2 interval sets.

Figure 2: standard 20' x 2 interval set.
Figure 2, above, illustrates the standard 20' x 2 interval set. The first 10 minutes are warm up. The two 20' "work" intervals, shown in black, are separated by a 5' "recovery" interval with 5 minutes for cool down for a total of one hour. Because the entire workout is only one hour long with plenty of time between sets, it's fairly easy to "knock off" one of these workouts.

Base 1


Whereas the previous Transition block focused on getting "back on the horse", so to speak, my Base 1 block was concerned with "hitting" key workouts (my previous blog discusses key workouts). The focus of this block was to establish a rhythm of 3 key workouts per week supplemented with some run and strength training.

Figure 3: the workouts comprising training Block 1.
Figure 3, above, shows the workouts done during this block. The plan was to use Tuesdays and Saturdays to gradually increase time spent at SS with Thursdays reserved for L5 work. I was able to execute fairly well on this part of the plan, bumping my SS sessions from 20 x 2 @ SS up to 30 x 2 @ SS by the end of the training block. I similarly happy with my L5 work, able to establish a weekly routine of 30/30 @ L5/L2 by the end of the training block.

Figure 4: standard 30' x 2 interval set.

Figure 4, above, illustrates the standard 30' x 2 interval set. The first 10 minutes are warm up. The two 30' "work" intervals, shown in black, are separated by a 2' "recovery" interval with 3 minutes for cool down for a total of 1 hour 15 minutes. The two dotted horizontal lines delineate my sweet spot range. Though this workout is a little tougher, mentally, than the 20' x 2 workout, by working up to it by first doing some 25' x 2 workouts, at only 1 hour 15 minutes, this workout is still quite doable.

Figure 5: standard 30/30 x 10 x 4 interval set.
Figure 5, above, illustrates the standard 30/30 x 10 x 4 interval set. The first 10 minutes are warm up. This is followed by 4 sets of 30/30. Each set is comprised of 10 reps of 30" at L5 followed by 30" at L2 with a 5' recovery interval following each set for a total of 1 hour 10 minutes. The upper and lower dotted line delineate the upper boundary of my L5 and L2 zones, respectively.

Though my rehab on the bike progressed quite nicely, my strength and run training did not fare as well. I lasted two strength training workouts before hurting my lower back making time on the bike extremely uncomfortable over the first half of the block. My run training didn't fair much better as sciatic pain in my left glute eventually put a stop to my run training. Both injuries were a direct result of my hip injury.

Performance Manager Chart (PMC)


Though I was able to get back on the bike fairly soon after surgery, because the volume of training was so much lower than what I had been doing up until the crash, I lost a lot of fitness.

Figure 6: loss training load incurred from date of surgery through the end of block 1.
The Performance Manager Chart (PMC) in Figure 3, above, shows the loss of training load from date of surgery through to the end of Block 1 (The PMC is discussed in a little more detail in my previous blog ). As you can see from the graph, training load decreased drastically during the Transition (Pretraining) period before leveling off somewhat in Block 1.

Interestingly, Figure 6 shows a spike in Weeks 2 and 3 where some favourable weather permitted several (3) decent outside rides. In my previous blog, I explain why Winter training is not particularly suited to increasing training load. The blip in Figure 3 illustrates this well. In the span of just 3 rides, my training load jumped 20% from 50 to 60 TSS/day. Whereas riding outdoors is conducive to accumulating large doses of training load, this is not practical on the trainer. For example, on Nov 5, I completed a 105 km group ride during which I expended a training stress score (TSS) of 255. This contrasts sharply with the trainer workout done the following week in which only 70 TSS was expended. Though it is possible to accumulate a lot of training load (TSS) on the trainer, it requires an extremely high level of motivation and commitment and, as such, isn't practical .

Outside vs Indoor training


Though outside riding is better for accumulating training load, indoor training provides more focus at the different training levels.

Outside Group Ride


Figure 7: time spent at each level for the outside group ride of Nov 5, 2014.
Figure 7, above, shows the amount of time spent at each level for the outside group ride of Nov 5 ride discussed above. The chart shows ride time distributed across levels. With more than 25% of the ride at Threshold (L4) or above, this was a fairly hard group ride. Yet, what's interesting is that, though this was a hard ride, the bucket with the largest amount of time (35%) was L1 indicating that over 1/3 of the ride was spent in Active Recovery. Morevover, the high variability Index (VI) for the ride (1.22) tells us that power output was all over the place. This is fairly typical of a group ride and demonstrates why it is hard to target specific training levels while riding with a group.

Figure 8: cadence distribution for outside group ride of Nov 5, 2014.

Figure 8, above, shows the cadence distribution for the same ride. What this figure shows is that over 30 minutes of the group ride was spent coasting (rpm between 0 and 10). Further evidence illustrating the difficulty of targeting specific training levels on a group ride.

Outside Solo Ride


Figure 9: Power distribution for an outdoor solo ride of Nov 1, 2014.
Figure 9, above, shows the power distribution of an outdoor solo ride done just a few days earlier than the Nov 5 group ride. Comparing this chart to the group ride of Figure 7, we can see that less time was spent in Active Recovery with more of a focus at L2/L3. The variability index (VI) for this ride was 1.13 which, compared to the VI of 1.22 in the group ride again illustrates this as a more focused ride.

Though time spent at L1 was lower for the solo ride than the group ride, it was still quite high at 25%. Contrast that to the trainer workout shown below.

Figure 10: time spent at each level for a trainer workout (Nov 12, 2014).
Figure 10, above, shows the power distribution for a trainer workout. The workout was comprised of 10' of warmup followed by two 25' SS intervals separated by a 2' recovery interval. Cool down was 3' for a total of one hour. What the figure shows is that nearly 85% of the time was spent in the target zones (L3 and L4) with only 2.5% spent at L1. Moreover, the variability index (VI) of 1.02 shows that the power was extremely constant for most of the workout. In other words, from a training perspective, this was a very focused workout, something unlikely to be achieved from a group ride or even a solo outdoor ride.

Summary


In this blog, I document my rehab from hip surgery. Overall, despite losing a lot of fitness (which was to be expected), my progress on the bike exceeded expectations leading me to be optimistic about the rest of the season. Progress off the bike was less promising but I can live with that, for now. I also further illustrated why outdoor training is better for accumulating training load whereas Winter training is more suited to training focused on the different levels.


Thursday, January 1, 2015

2014-2015 Winter Training

I've written a number of articles about Winter training in previous blogs but I thought I'd write a series of blogs about my current Winter (2014-2015) season, partly to make clear in my own mind what my goals are, partly to motivate myself, and partly for anyone who might find my blog helpful in their own training.

The Goal

"Alls you can do is alls you can do"

My training schedule for this season is a little different from previous seasons due to surgery for a hip fracture incurred Sep 7 of this year. Rather than establishing a solid base from which to build, as in previous years, the past 3 months have been more about rehab. My power is down from this time last year and my workout intervals shorter so it will be a challenge to try and get back to where I was. "Alls you can do is alls you can do".

Figure 1: Performance Manager Chart (PMC) from date of surgery to today.
The above figure, depicts my drop in fitness from surgery through to today. The blue line tracks Chronic Training Load (CTL) which, in layman's terms, is a proxy for fitness (see here for a more detailed discussion of CTL). Hereafter, I'll refer to CTL simply as training load. The higher one's training load, the better one's fitness. What's clear from the chart is I've lost a lot of fitness since my surgery.

While the Performance Manager Chart (PMC) above provides a useful "bird's eye" view of fitness, it doesn't describe how that fitness is comprised. For this, we need to discuss the concept of Levels.

LevelDescription%FTPTypical workout
1Active Recovery<=55%30-75 min
2Endurance56-75%2-5 hrs
Tempo76-90%1.5-3 hrs
Threshold90-105%20 min
VO2 Max106-120%3-8 min
6Anaerobic power>121%30 s -2 min
7Neuromuscular powern/a<=20 sec
Table 1: Andy Coggan's Power-based training levels. More detail on Coggan's training levels can be found here here.

The above table lists Andy Coggan's power-based training levels. The concept of training levels is similar to training zones except that levels are defined in terms of %FTP whereas zones are typically defined in terms of heart rate (HR). We won't get into a discussion of semantics here. Suffice to say that each training level describes a different "quality" of training. Whereas one could have a high training load comprised entirely of Endurance (L2) miles, an optimal training program provides an appropriate mix of all levels and while Winter training is not so good for for maximizing training load (you'd need the type of volume that outdoor riding affords, for that), it does afford an excellent opportunity to focus one's training at each of the different levels. 

My Winter training goals generally tend to be process-based as opposed to numbers based. From previous years, I have a pretty good idea of the workouts I can manage and the degree to which I can build on them. This helps when mapping out a training schedule and so, using previous experience, my primary goal will be simply to increase training load through an appropriate mix of training levels and let the numbers will take care of themselves.

A secondary (process-oriented) goal that I'll carry through my Winter training will be to keep my workouts between one hour and one hour 15 minutes. This duration is long enough to get in a quality workout but not so long as to cause me to dread the trainer as has happened in previous seasons. It's also a short enough duration to not take much out of my day.

Figure 2: I'll be sporting some new hardware at next year's races.

The Schedule

"Use it or lose it."

I constructed my first training schedule over a decade ago, using Joe Friel's "The Triathlete's Training Bible". Friel's "bible" details how to build a training schedule following a Periodized Training Plan organized in "blocks" of 3-6 weeks. The first 2 or 3 blocks of the schedule establish a "Base" on which subsequent training is "built". The middle 2 or 3 blocks "Build" upon that "Base" by adding some intensity while the final 2 to 3 blocks are used to "Peak" just in time for some key event. I've used some variation of this pattern through each of my Winter training seasons since then with the main difference being that my training blocks have trended towards being more intensive than what is traditionally prescribed for the "Base" period. The principle, however, is still the same: establish a base, build on that base, and peak for some key event.

BlockDatesWeeks
TransitionSep 15 - Oct 195
Base 1Oct 20 - Nov 306
Base 2 Dec 1 - Jan 116
Base 3Jan 12 - Feb 226
Build 1Feb 23 - Apr 56
Table 2: My Winter training schedule divided into blocks.

The table above shows my Winter training schedule divided into blocks. The bulk of my Winter training, the middle 3 blocks, is Base training. This essentially lays a foundation upon which future training can be built. The final block focuses on building higher end power in order to prepare for the start of race season.

In a traditional Periodization schedule, Base training would be comprised primarly of Level 2 training. This works well for the Pro-cyclist who has time to ride 6 or more hours a day and trains where conditions are favourable. But for the time-contrained weekend warrior living in Canada, Winter training is restricted for the most part to the "trainer". To compensate for lack of training volume, intensity must be increased. My Base training, therefore, is comprised mostly of training at Levels 3 and 4 with enough training at Levels 5, 6, and 7 to prevent my upper end from going dormant.

Training blocks

In a traditional Periodization training block, training load is gradually increased each week through a concomitant increase in training volume and/or intensity with the final week reserved for recovery. Sounds good in theory but what I've found is I tend to start off too hard in week 1 and begin to fade by the end of the third week instead of that being my strongest week. The main problem stems from having too much energy in that first week (which usually follows a recovery week). I tend overdo that first week which compromises the rest of the training block.

After trying in vain to adapt to a traditional training block for several seasons, I began to experiment with more of a focus on intensity in week 1, switching to a focus on volume in week 2, and a focus on recovery in week 3. This pattern is repeated in weeks 4-6 but with a little more intensity and volume in weeks 4 and 5, respectively. This pattern works well for me as it enables me to put that energy in week 1 to good use with a focus on intensity. Backing off the intensity a bit in week 2 enables me to complete the schedule. Finally, inserting a quasi-recovery week in week 3 sets me up for the final 3 weeks of the 6-week block.

Figure 3: Typical Winter training block
The figure above shows a typical training block. Intensity tends to be somewhat higher in weeks 1 and 4. Weeks 2 and 5 back off the intensity a bit while volume is increased via Saturday mega-workouts. Weeks 3 and 6 reduce both volume and intensity and the focus is on recovery.

Training weeks

My training weeks are organized around key workouts. I can usually "absorb" 3 or 4 key workouts in a week where "absorbing" a workout involves completing it but also recovering sufficiently from the workout to be able to complete the next one. Trying to cram more than 3 or 4 key workouts into a week compromises recovery. Referring to Figure 3 above, key workouts, shown in red, are scheduled for Tue, Thu, Sat, and Sun. Recovery days are Mon and Fri with Wed being a "depends how I feel" day. It can be a training or recovery day depending on how I feel.

The Workouts

The Sweet Spot 

Whereas most of Base training in a traditional Periodization schedule would be at or around Level 2, for most of us the intensity must be increased. "Increased to what," you might ask? The answer can be explained by the Sweet Spot Concept (explained in more detail here). The Sweet Spot Concept basically trades off volume for intensity. At lower intensities, training effect is reduced. At higher intensities, training effect is increased but recovery takes longer and volume must be reduced. Somewhere in between is the "best bang for the buck". This "in between" zone has been termed the Sweet Spot.

Most of my Base training utilizes two sweet spot ranges. My primary sweet spot (SS) range falls between 88 and 92 percent of FTP, straddling the border between Levels 3 and 4. My secondary sweet spot range backs off the intensity just a bit (for a volume-focused week, for example) with my target power right around 85% of FTP which is in the upper range of Level 3 (L3).

Figure 3 shows that most of the key workouts (Tue, Sat, and Sun) are sweet spot (L3 or SS) workouts.


Level 7 (Hour of Power) workout 

In a traditional Periodization schedule, higher intensity workouts are usually reserved for later in the season, typically during the Build and Peak blocks. Through experimentation, however, I've found it beneficial to include some higher intensity workouts all year round and like to include at least some work at each Level. I find this useful both in terms of training the relevant systems at each level but also because it enables me to build workouts that simulate race conditions. My Level 7 workout, coined the hour of power (HOP) by Bill Black (see the Recovery on the Edge article about halfway down the page using this link), is one such workout.

Referring to Figure 3, the Level 7 are scheduled on Tuesdays. The HOP is comprised of one hour at either Level 3 (L3) or Sweet Spot (SS). The wrinkle in the workout is a Level 7 "burst" of between 15-20 seconds done every 3 minutes for a total of 20 bursts per workout. These are tough workouts. One hour continuous at L3 or SS is tough enough but adding 20 "bursts" makes this quite a grueling workout. It's also an excellent simulation of the bursts that typically occur throughout a Road Race and especially a Crit making this one of my favourite workouts.

Level 5 (VO2 Max) workouts

Referring to Table 1, VO2 Max workouts typically fall between durations of 3 to 8 minutes. These workouts are very hard, requiring more than the usual amount of recovery. For this reason, I don't do them every week but rather alternate them with more manageable 30/30 (or Billat) intervals. Whereas a typical VO2 Max workout is comprised of four sets of 5 minutes at VO2 Max, my typical 30/30 workout is comprised of four sets of 10 reps with 30 seconds at VO2 Max followed by 30 seconds at L2 for a total of 10 minutes per set. While not quite the same as the full-blown 5 minute intervals, the 30/30 intervals provide the same duration at VO2 Max (5 minutes per set) while being much easier to "absorb". They also provide the added benefit of simulating the race condition of being in a break where one is frequently working hard at the front for about 30 seconds then recovering in the draft for a short period of time.

Referring to Figure 3, the Level 5 workouts are scheduled on Thursdays with the full 5 minute intervals done in weeks 1 and 4 and the easier 30/30 sets done in weeks 2 and 5. During the Base period, the durations are kept constant so as not to incite an early peak. When peaking for a key race, however, I'll increase the volume by increasing the interval duration, the number of reps (for the 30/30 workouts), and/or the number of sets.


Level 6 (Anaerobic) workouts

Each season, I like to experiment with something I haven't tried before. This season, my experiment is to incorporate L6 workouts into my training. A typical L6 interval is between 30 seconds to two minutes. Interestingly, while browsing the Wattage Google Group, I came across a discussion with Aaron Fillion (one of Ontario's strongest cyclists and this year's Elite Provincial TT champion) where I learned that Fillion's's key workouts are comprised of "all out" one minute intervals and "all out" 2.5 minutes intervals. I asked him about the reason for choosing these intervals:
The basis for everything in my training is to simulate racing. Usually a 1 minute effort is what would happen on an attack or on short climbs. An effort in the 2 to 3 minute range is usually the time required to make a break stick before you can set in to a rhythm.
If this workout works for Fillion then I'm willing to try it. In addition to simulating specific race conditions, this workout also has the added benefit of targeting my L6 which up until now I haven't been specifically targeting.

Referring to Figure 3, my Level 6 workouts are scheduled for Sundays but only in weeks 1 and 4. The workout is comprised of two 2.5 minute L6 intervals during each of two 20 minute L3 intervals for a total of four intervals at L6 per workout. I've only tried one of these workouts to date and found it to be about as hard as a VO2 Max workout so I'm embarking on this experiment cautiously, incorporating only two of these workouts per block, in order to reduce the risk of inducing a premature "peak".


Level 4 (Threshold) workouts

"Sooner or later you have to increase the power"

Maximizing time spent at Sweet Spot is an excellent way of elevating one's FTP but if you intend to ride for any length of time at threshold power (e.g. during a TT), it's not a bad idea to spend at least some time training at threshold (L4) power. Killing two birds with one stone, my training block includes an FTP test at the end of each block which provides me with a fresh estimate of my FTP as well as giving me some training time at L4.

Summary

In this blog, I've covered my current Winter training season goals as well as the anatomy of the training schedule that I hope gets me there, defining that schedule first in terms of training blocks then in terms of a typical training week and finally in terms of key workouts. In subsequent blogs, I'll discuss how well I've followed my plan as well as provide more detail on the workouts.